
VRTCAL iOS SDK Integration Guide -- SDK VERSION 2.1.5
Introduction
Thank you for your interest in the VRTCAL iOS SDK! We’re proud to offer a mobile SDK with many publisher-focused features.
Sign up for an account at https://vrtcal.com to download the SDK.
Technical Support
Need help? Please email us at support@vrtcal.com.
You can also find helpful information at https://vrtcal.com.
Table of Contents
- Minimum Requirements
- Installation
- Showing Banner Ads
- Showing Digital Audio (DAAST) Ads
- Showing Interstitial Ads
- Important Notes
- GDPR
- Ad Mediation (VRTCAL to Google SDKs [AdMob/GAM])
- Ad Mediation (VRTCAL to AppLovin)
- Ad Mediation (VRTCAL to IronSource)
- Ad Mediation (VRTCAL to Fyber-FairBid)
- Ad Mediation (VRTCAL to Fyber-Marketplace)
- Ad Mediation (VRTCAL to Smaato)
- Ad Mediation (VRTCAL to Tapjoy)
- Ad Mediation (VRTCAL to Vungle)
- FAQ
Minimum Requirements
SDK Size: 3.8MB
Average Memory Footprint: <10MB
The Vrtcal SDK fully supports iOS 10.0 and higher. Additionally, iOS 9.0 is supported, but deprecated and ads will not be shown.
The Vrtcal SDK uses the arm64 Device Capability which excludes:
- iPhone 5
- 1st Generation iPad Mini(2012)
- Other Apple Devices released prior to Autumn 2012
Installation
Installation via CocoaPods
CocoaPods is a dependency manager for iOS projects which automates and simplifies installation of 3rd-party libraries. You can install CocoaPods with the following command:
To integrate VRTCAL SDK using CocoaPods, add the VRTCAL adapter for your primary SDK to your Podfile. Example PodFile:
Then run the following command:
You will still have to perform the steps “Modify AppDelegate” and “Update Info.plist” from the manual installation steps.
Manual Installation
Download the SDK
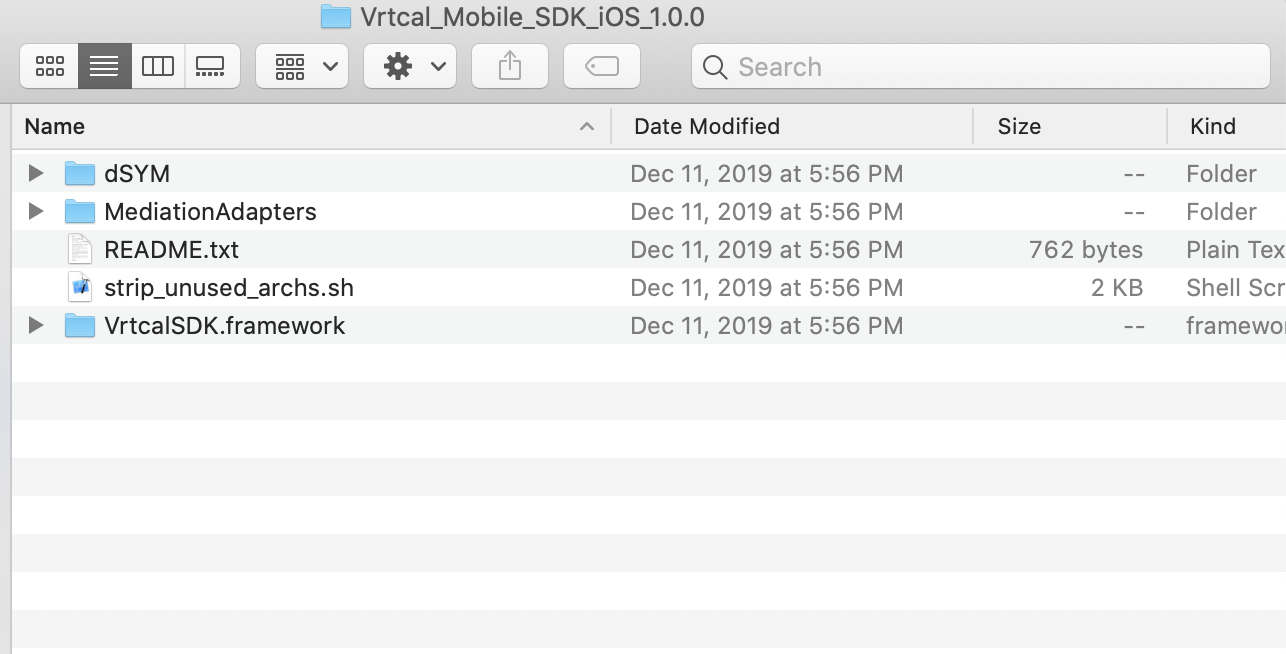
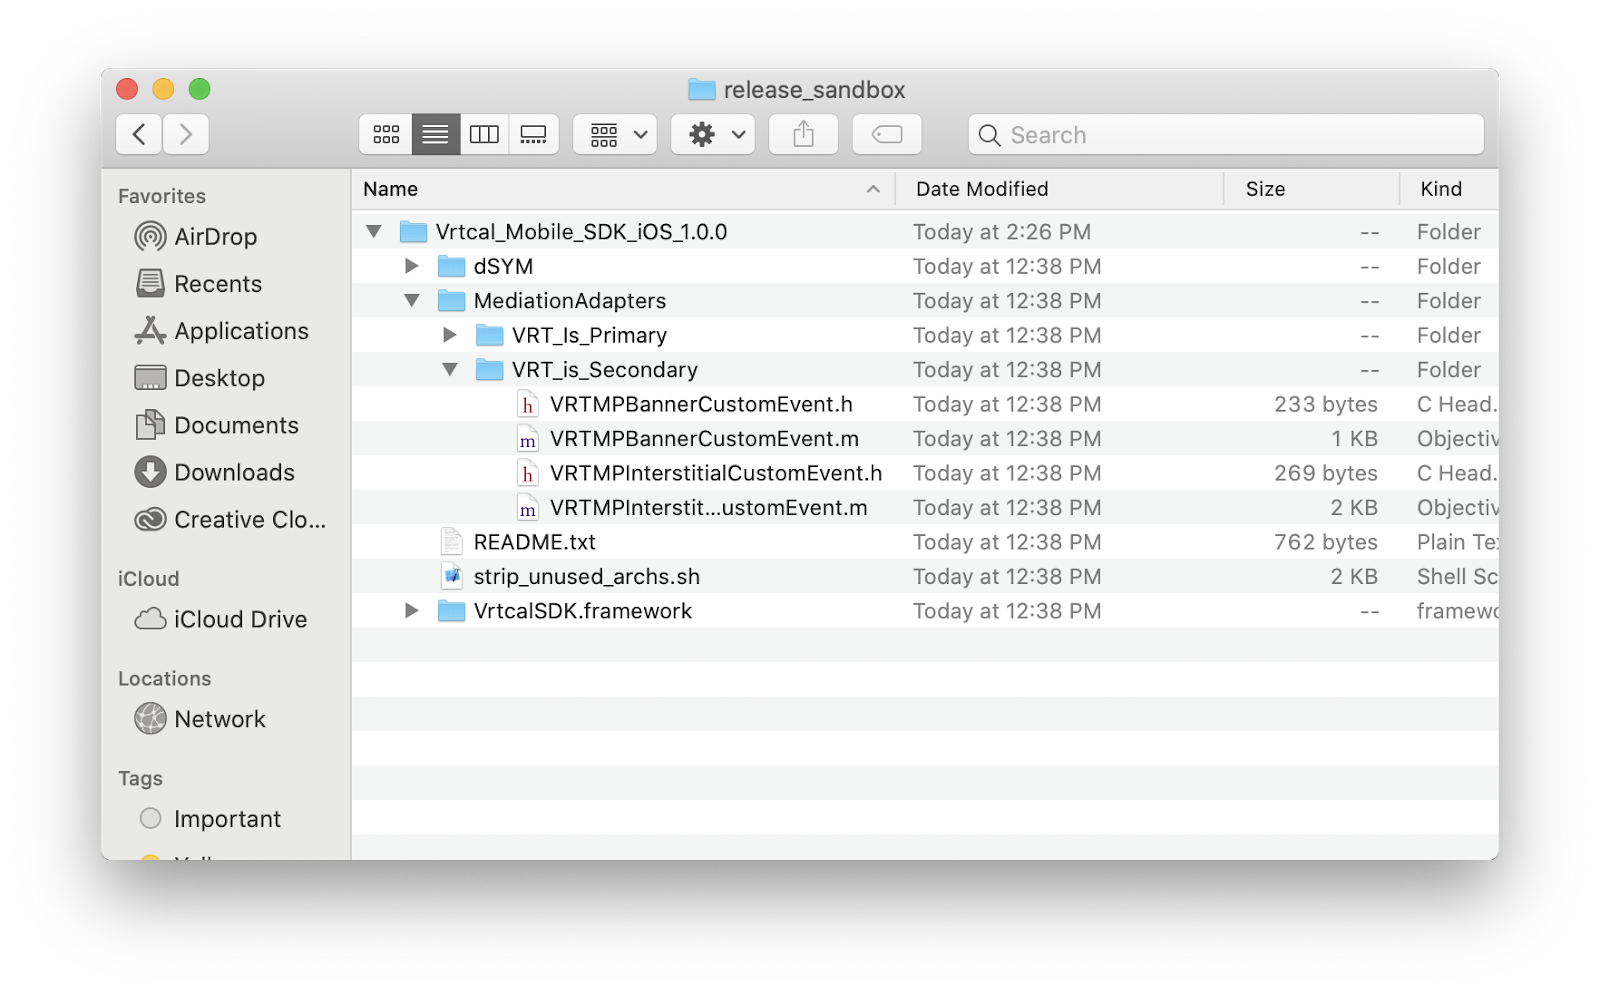
Download our SDK from https://ui.vrtcal.com/sdk_downloads/VRTCALSDK_iOS_2_1_5.zip and unzip the file. The resulting vrtcal-sdk directory will have the following files:
Add VrtcalSDK.framework to your App
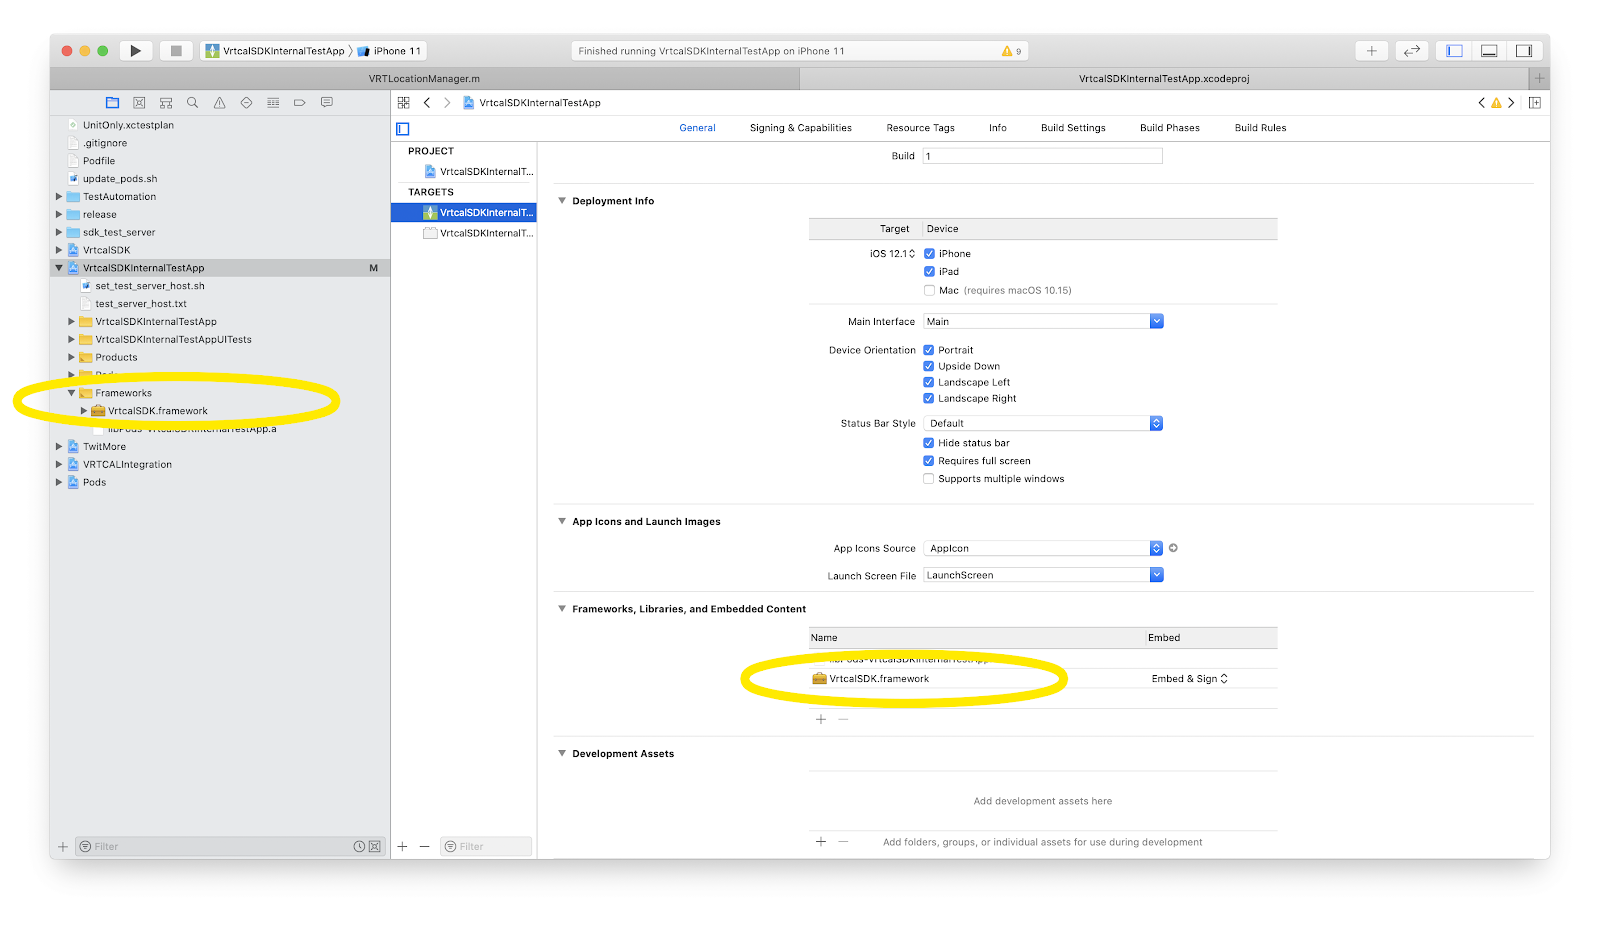
Download VrtcalSDK.framework and add it to your projects Frameworks Folder (If the folder doesn't exist, create it).
Verify that VrtcalSDK.framework is in Frameworks, Libraries, and Embedded Content and that Embed & Sign is selected.
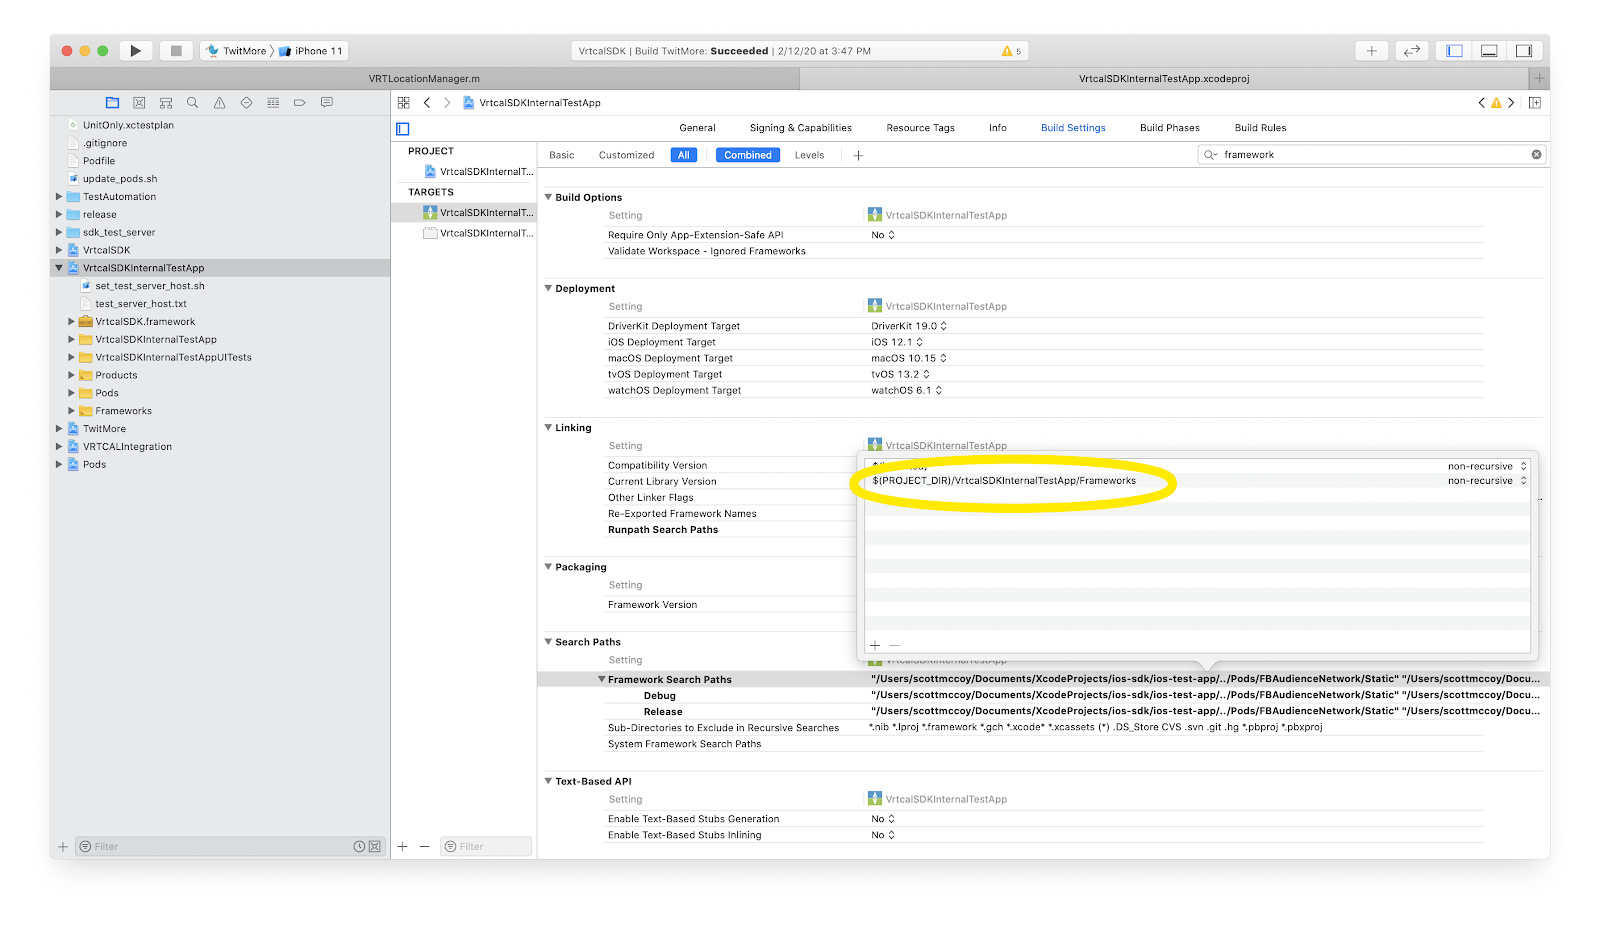
Verify that under Project->Targets(your app)>Build Settings->Search Paths a path in the Framework Search Paths section points to the Frameworks directory:
Modify AppDelegate for AdMob(same as GAM) Adapter
In your AppDelegate, import VrtcalSDK and Initialize the SDK with your application ID:
Swift:
VrtcalSDK.initializeSdk(withAppId:1, sdkDelegate:self)
Objective-C:
[VrtcalSDK initializeSdkWithAppId:appId sdkDelegate:self];
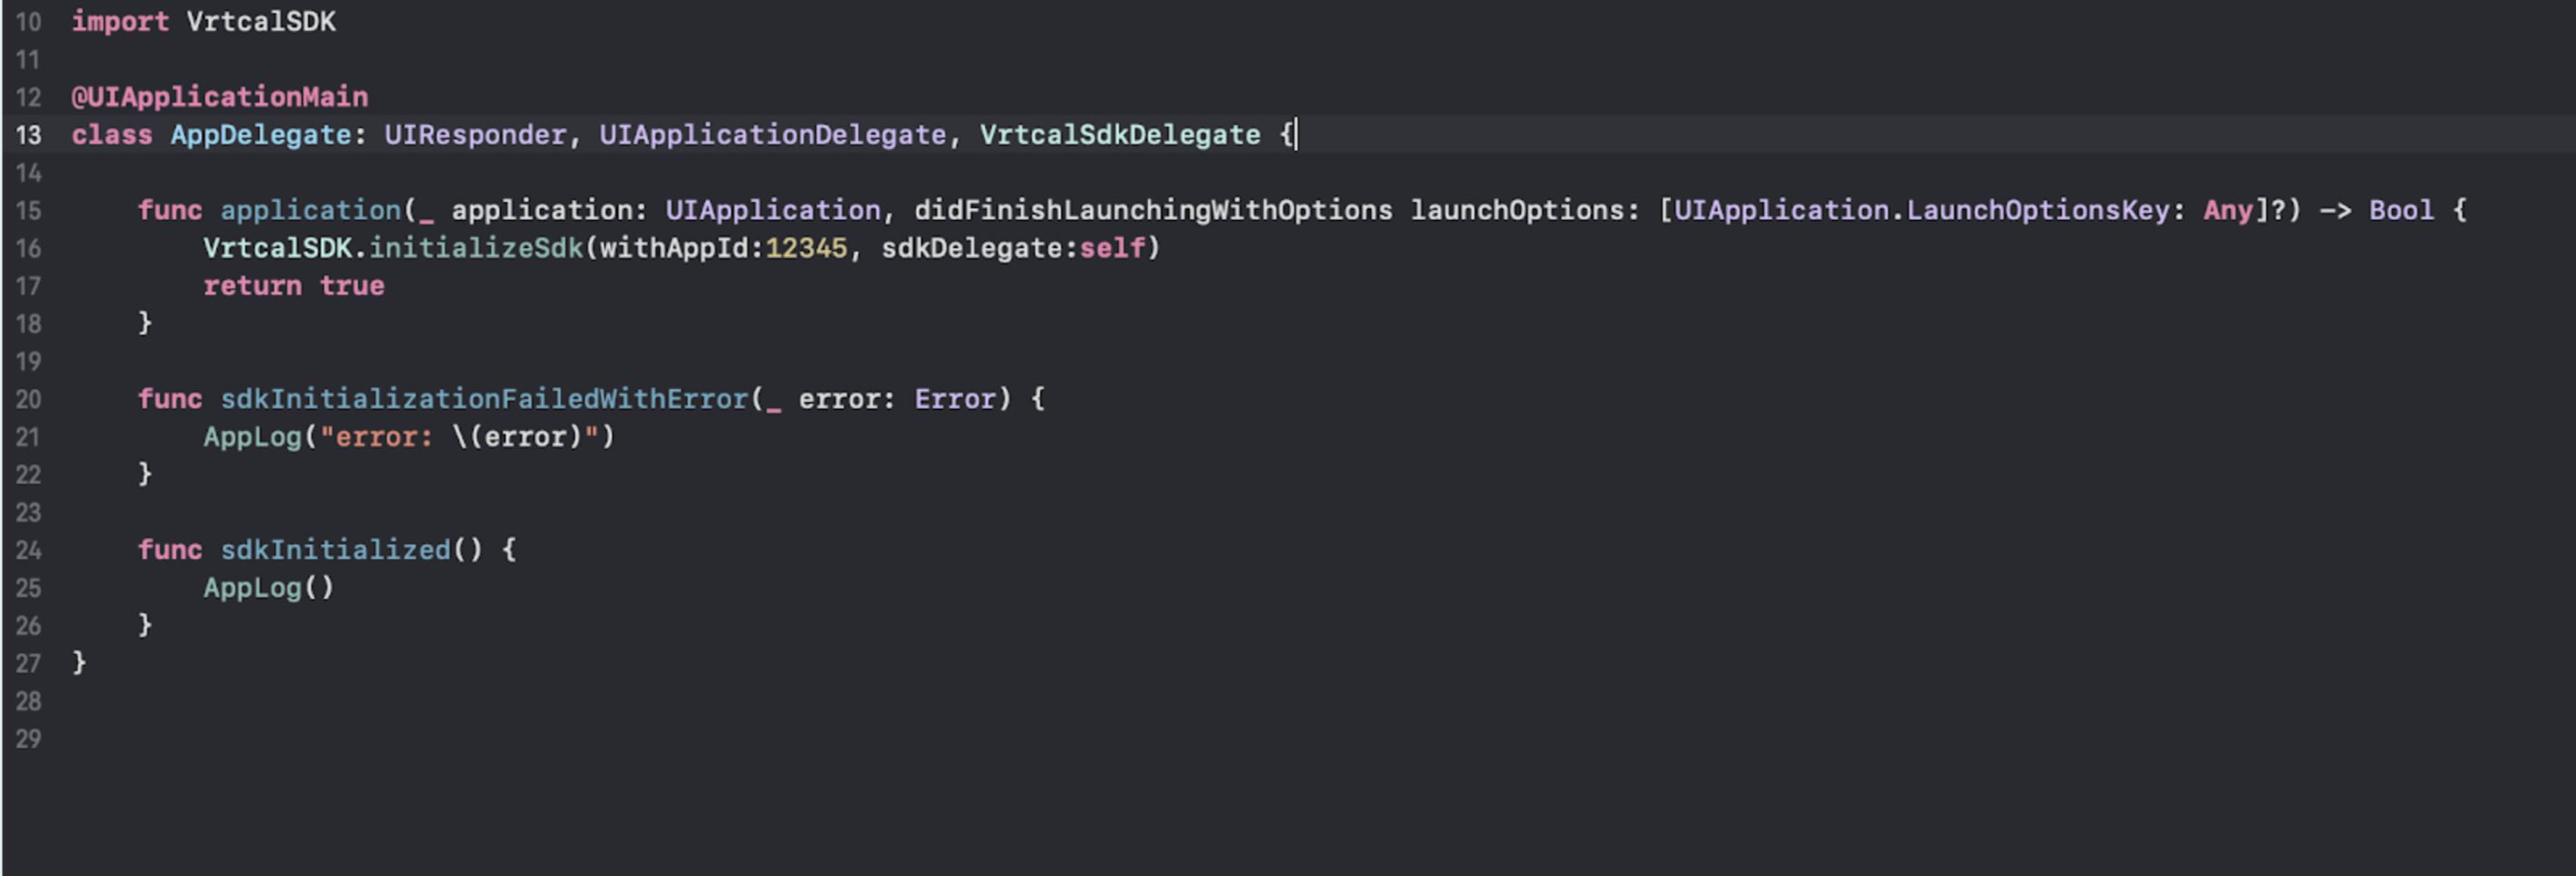
If you do not wish to be alerted to the success or failure of Vrtcal SDK’s initialization, you may set sdkDelegate to nil.
Update info.plist
Though the Vrtcal SDK communicates entirely with https some ad content still uses http. In order for these ads to load correctly and to increase revenue, please add an exception to App Transport Security settings:
<key>NSAppTransportSecurity</key>
<dict>
    <key>NSAllowsArbitraryLoads</key>
    <true/>
</dict>
The VRTCAL SDK supports MRAID 3.0 ads which, if the user has interacted with the ad, may ask via a popup to perform an action such as write to the photo album, add a contact to the user’s contact list, or create a calendar event:
<key>NSCalendarsUsageDescription</key>
<string>Some ad content may access calendar</string>
<key>NSContactsUsageDescription</key>
<string>Some ad content may access contacts list</string>
<key>NSPhotoLibraryAddUsageDescription</key>
<string>Some ad content may access photo library</string>
The VRTCAL SDK will not ask the user for access to Location Services but if it is available to the application, it will use location data to enrich ad requests:
<key>NSLocationWhenInUseUsageDescription</key>
<string>Please allow access to Location Services</string>
Showing Banner Ads
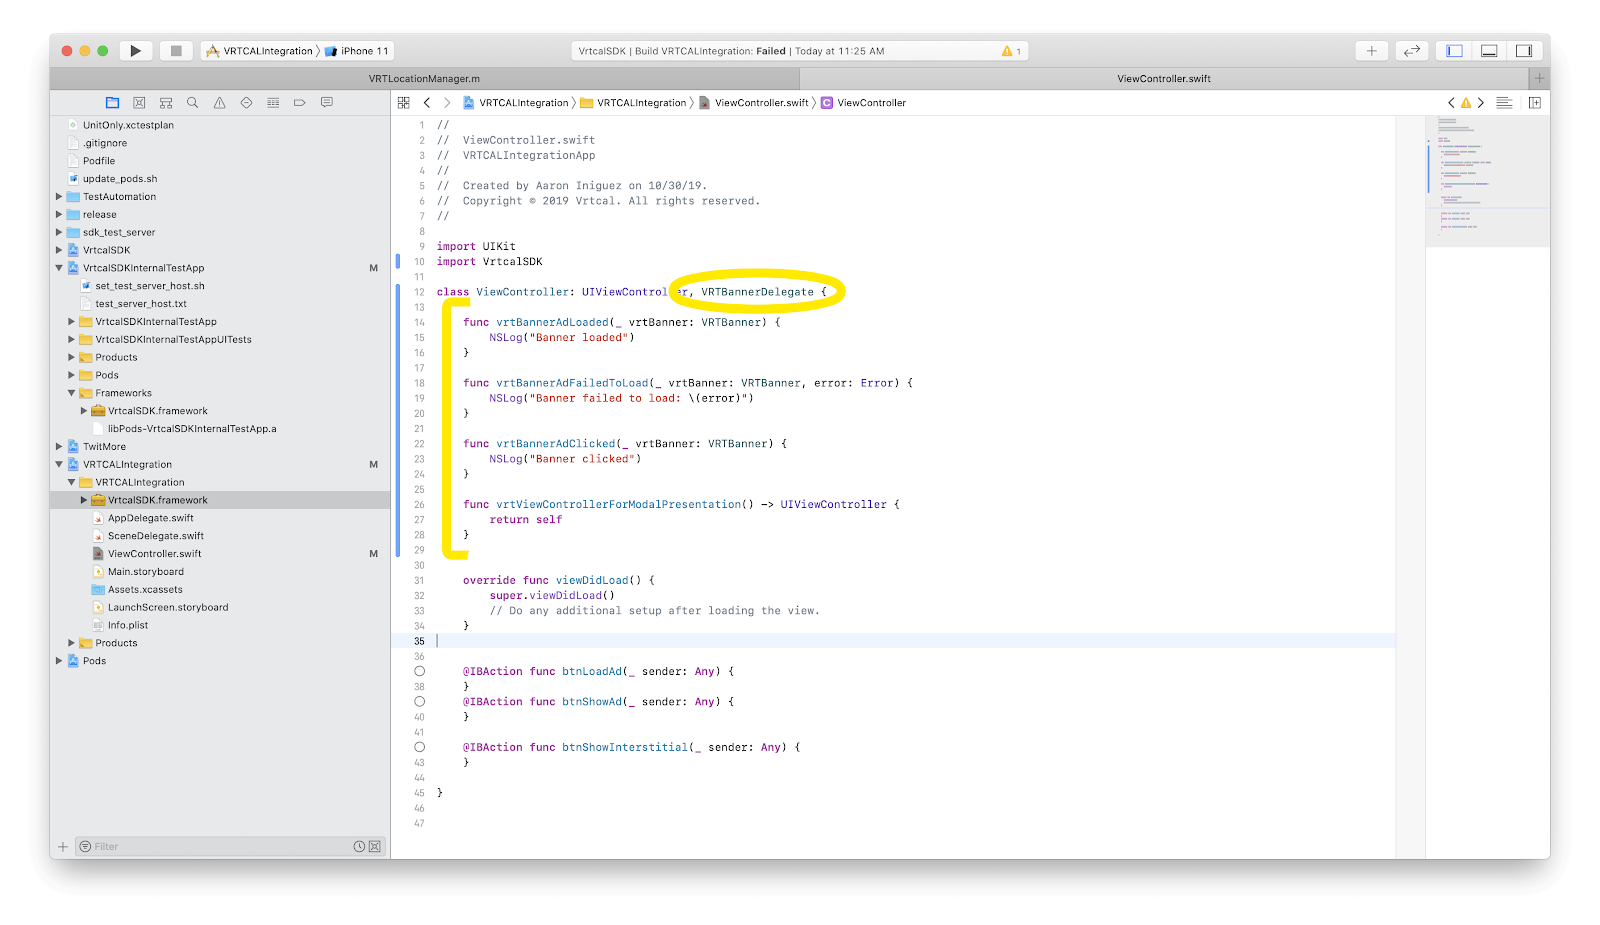
On the ViewController from which you will be serving ads, import the VrtcalSDK and implement VRTBannerDelegate:
Objective-C:
- (void)vrtBannerAdLoaded:(nonnull VRTBanner *)vrtBanner withAdSize:(CGSize)adSize {
}

- (void)vrtBannerAdFailedToLoad:(nonnull VRTBanner *)vrtcalBanner error:(nonnull NSError *)error {
}

- (void)vrtBannerAdClicked:(nonnull VRTBanner *)vrtcalBanner {
}

- (void)vrtBannerAdWillLeaveApplication:(nonnull VRTBanner *)vrtcalBanner {
}

- (void)vrtBannerWillPresentModal:(nonnull VRTBanner *)vrtBanner ofType:(VRTModalType)modalType {
}

- (void)vrtBannerDidPresentModal:(nonnull VRTBanner *)vrtBanner ofType:(VRTModalType)modalType {
}

- (void)vrtBannerWillDismissModal:(nonnull VRTBanner *)vrtBanner ofType:(VRTModalType)modalType {
}

- (void)vrtBannerDidDismissModal:(nonnull VRTBanner *)vrtBanner ofType:(VRTModalType)modalType {
}

- (void)vrtBannerVideoStarted:(nonnull VRTBanner *)vrtBanner {
}

- (void)vrtBannerVideoCompleted:(nonnull VRTBanner *)vrtBanner {

- (nonnull UIViewController *)vrtViewControllerForModalPresentation {
    return self;
}
Swift:
  func vrtBannerAdLoaded(_ vrtcalBanner:VRTBanner, withAdSize adSize: CGSize) {

  }

  func vrtBannerAdFailedToLoad(_ vrtcalBanner: VRTBanner, error: Error) {

  }

  func vrtBannerAdClicked(_ vrtcalBanner: VRTBanner) {

  }

  func vrtBannerWillPresentModal(_ vrtcalBanner: VRTBanner, of modalType: VRTModalType) {

  }

  func vrtBannerDidPresentModal(_ vrtcalBanner: VRTBanner, of modalType: VRTModalType) {

  }

  func vrtBannerWillDismissModal(_ vrtcalBanner: VRTBanner, of modalType: VRTModalType) {

  }

  func vrtBannerDidDismissModal(_ vrtcalBanner: VRTBanner, of modalType: VRTModalType) {

  }

  func vrtBannerAdWillLeaveApplication(_ vrtcalBanner: VRTBanner) {

  }

  func vrtBannerVideoStarted(_ vrtBanner: VRTBanner) {

  }

  func vrtBannerVideoCompleted(_ vrtBanner: VRTBanner) {

  }

  func vrtViewControllerForModalPresentation() -> UIViewController {
      return self
  }
- Do one of the following:
- Manually instantiate a VRTBanner:
let vrtBanner = VRTBanner(frame: CGRect(x:0, y:0, width:320, height:50)) -
- Create one in a Storyboard by adding a UIView Object and setting the custom class of the object to VRTBanner:
- Create an IBOutlet for the banner:
@IBOutlet var vrtBanner: VRTBanner!
- Set the banner’s adDelegate and implement all delegate methods. Call loadAd() with the zoneId of your ad. Note: If you need help setting up an ad unit check out the relevant docs here.
  // Ads
    vrtBanner.adDelegate = self
    vrtBanner.loadAd(1)
- If the banner successfully loads it will call
vrtBannerAdLoaded-withAdSizeand automatically display. If it fails, it will callvrtBannerAdFailedToLoad error. Banner refresh rates are controlled server-side and may be adjusted by editing your Vrtcal line item.
Showing Digital Audio (DAAST) Ads
Integration of Digital Audio ads is exactly the same as for Banner ads, with the exception that the banner’s “isDaast” property must be set to true:
let banner = VRTBanner(frame: frame)
banner.isDaast = true
If you choose to use the optional 320x50 companion banner instead of having the audio ad play only in the backgroud, you will need to add the Digital Audio banner to the view hierarchy. Example:
banner.bottomAnchor.constraint(equalTo: superview.bottomAnchor, constant: 1000).isActive = true
banner.centerXAnchor.constraint(equalTo: superview.centerXAnchor, constant: 1000).isActive = true
After a vrtBannerAdLoaded event, Digital Audio ads must be manually instructed to begin audio playback. Example:
banner.playDAAST()
NOTE: Digital Audio Ads will ALWAYS have a 320x50 companion banner available for optional use. If the advertiser supplies a companion banner, it will be present. If no advertiser companion banner is supplied, a generic companion banner will be present.
Showing Interstitial Ads
- On the ViewController from which you will be serving ads import the VrtcalSDK and implement VRTInterstitialDelegate: Objective-C:
- Instantiate a VRTInterstitial and set the adDelegate. Then call loadAd() with the zoneId of your ad unit as an argument:
- If the Interstitial successfully loads, vrtInterstitialAdLoaded will be called, at which point showAd may be called on the interstitial object to display the ad. If the interstitial fails to load, vrtInterstitialAdFailed will be called.
  - (void)vrtInterstitialAdClicked:(VRTInterstitial *)vrtInterstitial {

  }

  - (void)vrtInterstitialAdDidDismiss:(VRTInterstitial *)vrtInterstitial {

  }

  - (void)vrtInterstitialAdDidShow:(VRTInterstitial *)vrtInterstitial {

  }

  - (void)vrtInterstitialAdFailedToLoad:(VRTInterstitial *)vrtInterstitial error:(NSError *)error {

  }

  - (void)vrtInterstitialAdFailedToShow:(VRTInterstitial *)vrtInterstitial error:(NSError *)error {

  }

  - (void)vrtInterstitialAdLoaded:(VRTInterstitial *)vrtInterstitial {

  }

  - (void)vrtInterstitialAdWillDismiss:(VRTInterstitial *)vrtInterstitial {

  }

  - (void)vrtInterstitialAdWillLeaveApplication:(VRTInterstitial *)vrtInterstitial {

  }

  - (void)vrtInterstitialAdWillShow:(VRTInterstitial *)vrtInterstitial {

  }

  - (void)vrtInterstitialVideoCompleted:(VRTInterstitial *)vrtInterstitial {

  }

  - (void)vrtInterstitialVideoStarted:(VRTInterstitial *)vrtInterstitial {

  }

  - (UIViewController*)vrtViewControllerForModalPresentation {
    return self;
  }
  func vrtInterstitialAdLoaded(_ vrtInterstitial: VRTInterstitial) {

  }

  func vrtInterstitialAdFailed(toLoad vrtInterstitial: VRTInterstitial, error: Error) {

  }

  func vrtInterstitialAdWillShow(_ vrtInterstitial: VRTInterstitial) {

  }

  func vrtInterstitialAdDidShow(_ vrtInterstitial: VRTInterstitial) {

  }

  func vrtInterstitialAdFailed(toShow vrtInterstitial: VRTInterstitial, error: Error) {

  }

  func vrtInterstitialAdClicked(_ vrtInterstitial: VRTInterstitial) {

  }

  func vrtInterstitialAdWillLeaveApplication(_ vrtInterstitial: VRTInterstitial) {

  }

  func vrtInterstitialAdWillDismiss(_ vrtInterstitial: VRTInterstitial) {

  }

  func vrtInterstitialAdDidDismiss(_ vrtInterstitial: VRTInterstitial) {

  }

  func vrtInterstitialVideoStarted(_ vrtInterstitial: VRTInterstitial) {

  }

  func vrtInterstitialVideoCompleted(_ vrtInterstitial: VRTInterstitial) {

  }

  func vrtViewControllerForModalPresentation() -> UIViewController {
      return self
  }
  let vrtInterstitial = VRTInterstitial()
  override func viewDidLoad() {
    super.viewDidLoad()
    // Do any additional setup after loading the view.
    self.vrtInterstitial.adDelegate = self
    self.vrtIntertitial.loadAd(10024)
  }
    func vrtInterstitialAdLoaded(_ vrtInterstitial: VRTInterstitial) {
      vrtInterstitial.showAd()
    }
    func vrtInterstitialAdFailed(toLoad vrtInterstitial: VRTInterstitial, error: Error) {
      print("error: \(error)")
    }
Important Notes
Ad Lifecycle
You can only call loadAd() on VRTBanner or VRTInterstitial once for each instance. If you want to load another ad you must create a new instance. In the case of banners you should remove the old VRTBanner from the view hierarchy and replace it with the new one. This, however, does not apply if you use our SDK's banner refresh mechanism.
GDPR
We support IAB's GDPR framework. Follow IAB's instructions on how to save the user's GDPR settings in IOS NSUserDefaults and/or to integrate their SDK in your project. You should set GDPR settings before you invoke any VRTCAL SDK API functionality.
Ad Mediation
The Vrtcal iOS SDK supports mediation as both a Primary SDK (the one doing the mediating) and a Secondary SDK (one being mediated). Several mediation adapters are included in the “MediationAdapters” directory of your download:
Mediating Vrtcal SDK through Google SDKs [AdMob/GAM]
If you have not done so already, ask your VRTCAL account manager to create your Vrtcal ad unit. Ask for integration parameters and note the App ID and the newly created Zone Id.
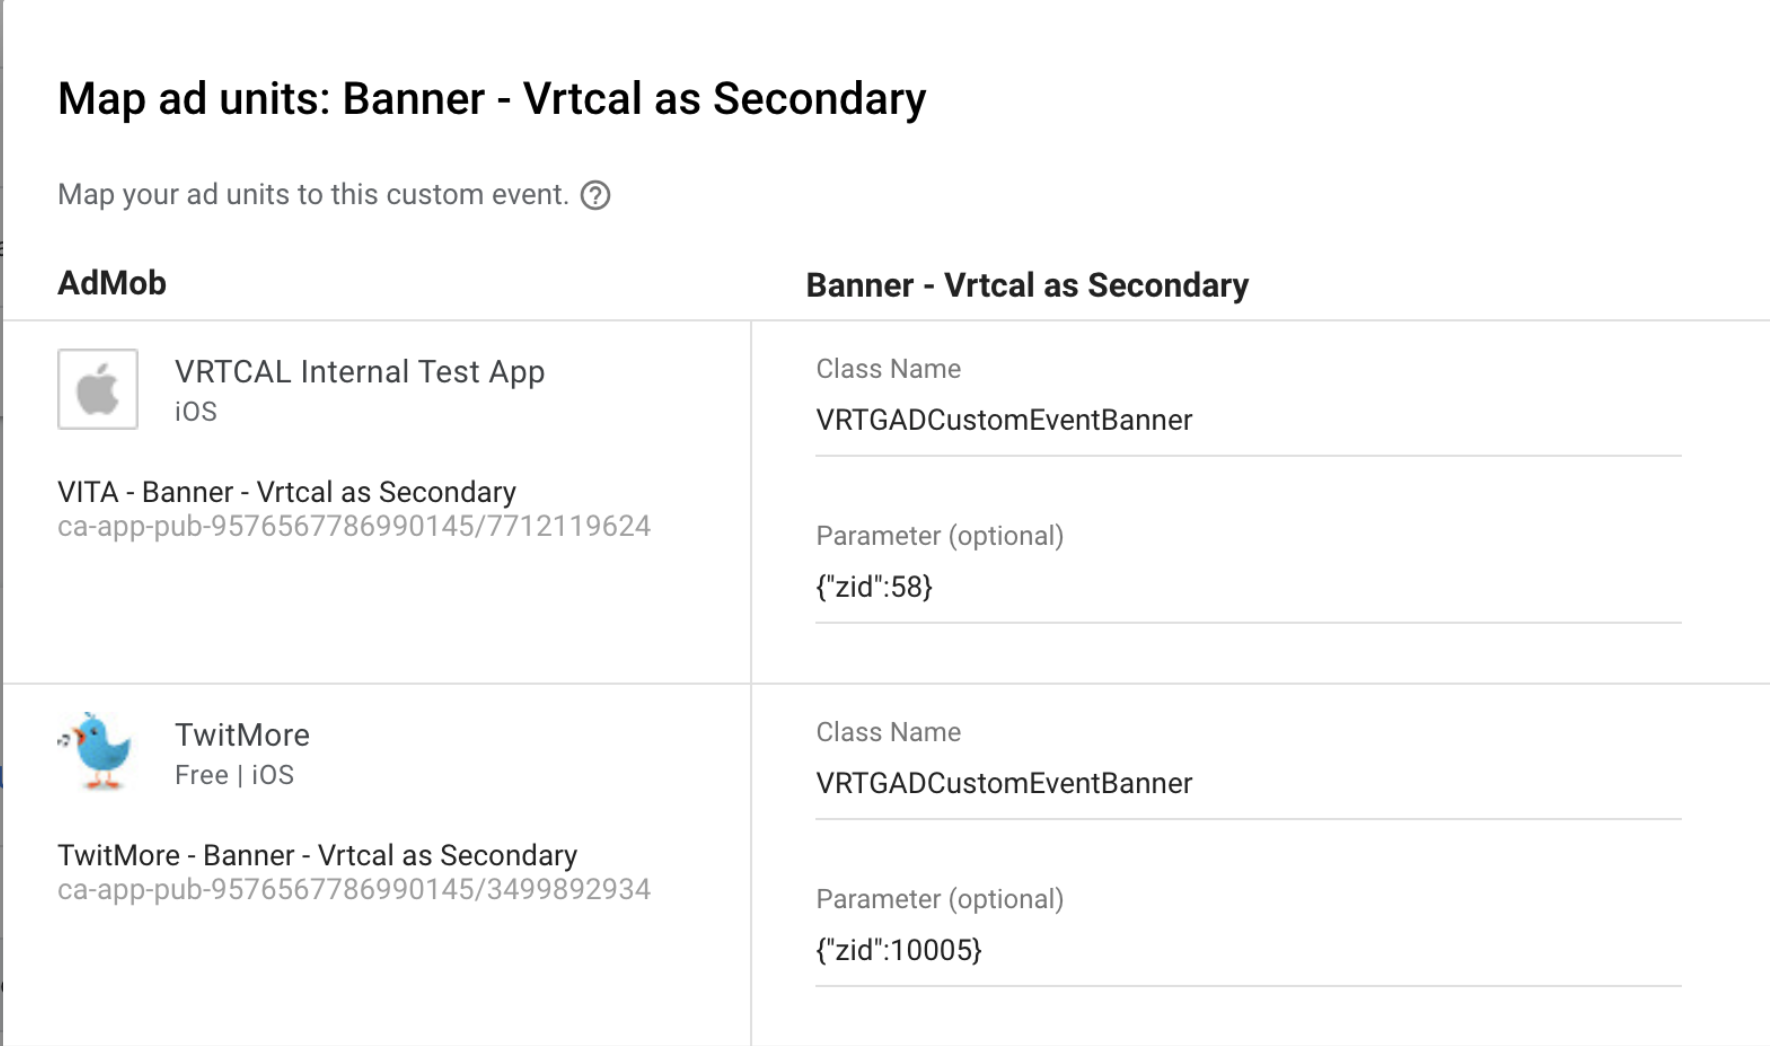
Create an ad unit & line item on https://apps.admob.com. Under the Map Ad Units section, set the following values:<
| Network | Custom SDK Network |
| Class Name | VRTGADCustomEventBanner for banners or VRTGADCustomEventInterstitial for interstitials |
| Custom Event Data | {"appId":"app_id","zoneId":"zone_id"}
Where app_id and zone_id are your app ID and ad unit ID, respectively. For example, if your App Id is 11073 and your Zone Id is 10005, you would enter: {"appId":"11073","zoneId":"10005"} |
Banner Example:
Please note that it can take about 5 minutes for changes to ad units & line items to take effect.
Either integrate the adapter via cocoapods (see above) or copy the following 4 files from your Vrtcal_Mobile_SDK download into your app’s Xcode Project:
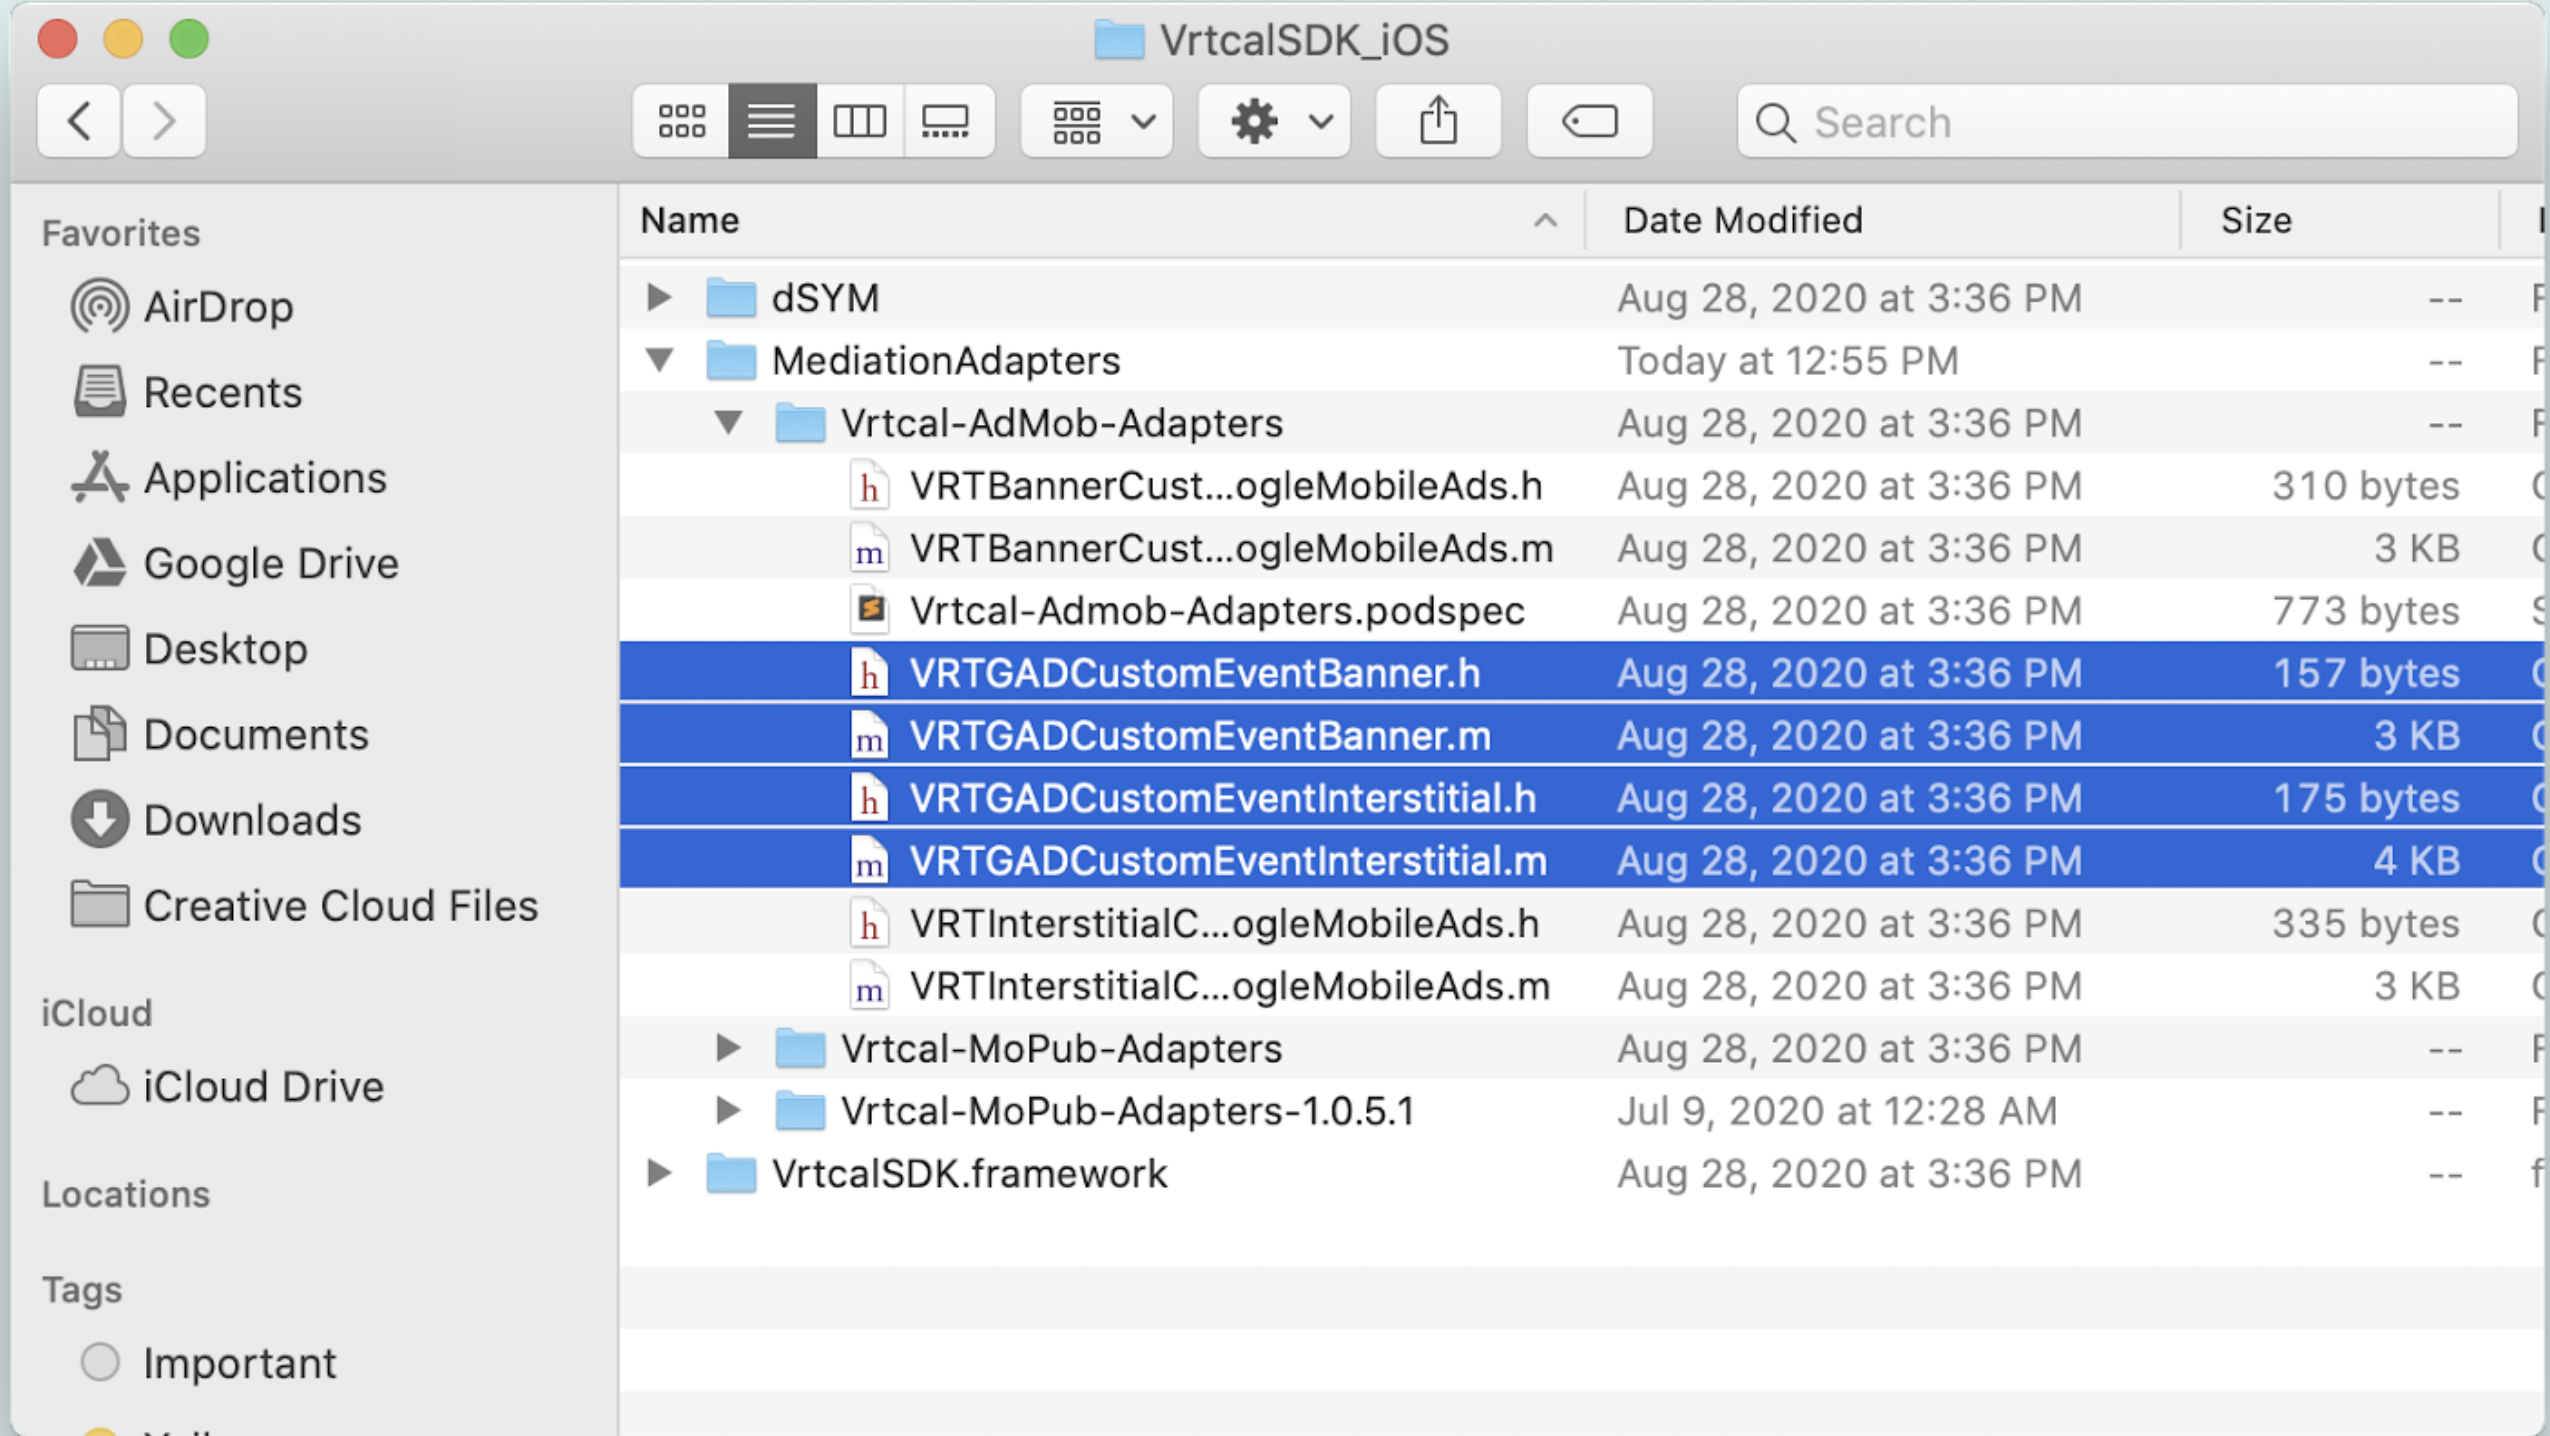
Your Google ad unit should now be capable of displaying Vrtcal ads.
Mediating Vrtcal SDK through AppLovin
Add the following line to your project's Podfile:
pop "Vrtcal-AppLovin-Adapters"
From the command line, run:
pod install- Alternatively, if you prefer not to use Cocoapods, put all the files from the Vrtcal-AppLovin-Adapters of your Vrtcal SDK download into your project.
- If you have not done so already, ask your VRTCAL account manager to create your VRTCAL ad unit. Ask for integration parameters and write down the App ID and Zone ID.
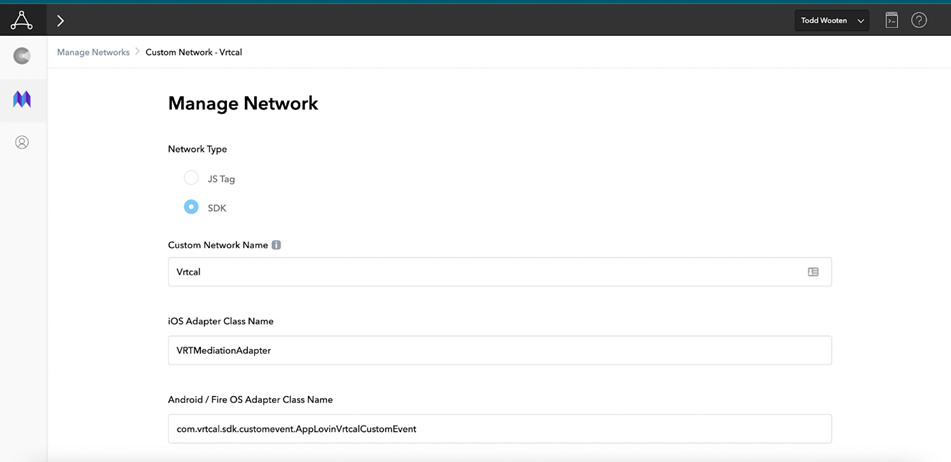
Create a Custom Network on applovin.com. Set the Network Type to SDK and the iOS Adapter Class name to VRTMediationAdapter.
- Create an ad unit and select your new Vrtcal Custom Network. Fill the App ID field with your Vrtcal App ID and the Placement ID with your Vrtcal Zone ID.
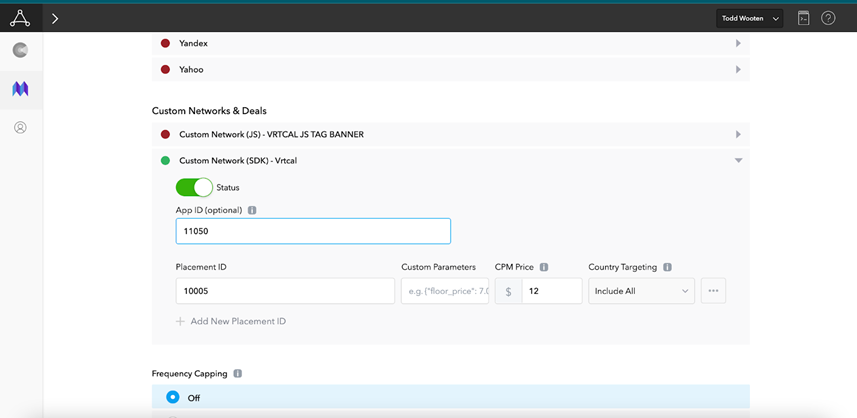
- Your AppLovin ad unit should now be capable of displaying VRTCAL ads.
Mediating Vrtcal SDK through IronSource
Add the following line to your project's Podfile:
pop "Vrtcal-IronSource-Adapters"
From the command line, run:
pod install- Alternatively, if you prefer not to use Cocoapods, put all the files from the Vrtcal-IronSource-Adapters of your Vrtcal SDK download into your project.
- If you have not done so already, ask your VRTCAL account manager to create your VRTCAL ad unit. Ask for integration parameters and write down the App ID and Zone ID.
In your IronSource account, go to SDK Networks and select Manage Networks, then click on "Custom Adapter".
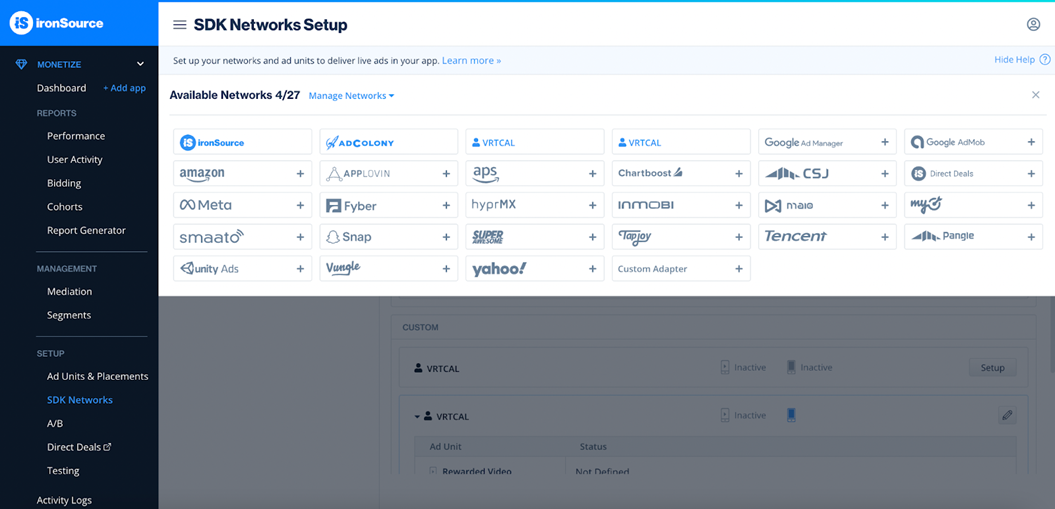
- At the "Custom Adapter" prompt, enter "VRTCAL" for the network key.
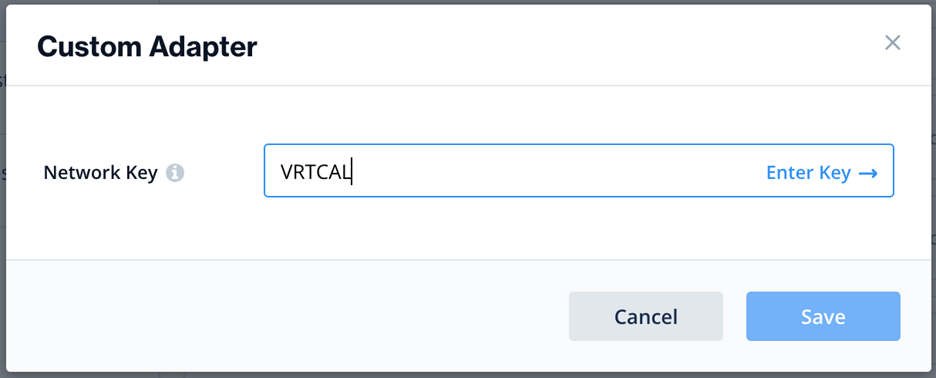
- Select "Interstitial" and enter your App ID and the Zone ID you will be mediating with.

- Under "SDK Networks", select your app and make sure that "Intersitital" is set to "Active".
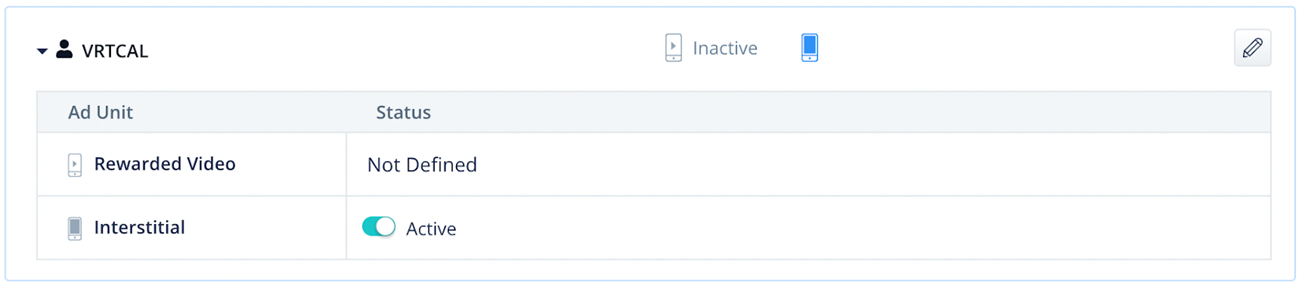
- Your IronSource ad unit should now be capable of displaying VRTCAL ads.
Mediating Vrtcal SDK through Fyber-Fairbid
Add the following line to your project's Podfile:
pop "Vrtcal-Fyber-FairBid-Adapters"
From the command line, run:
pod install- Alternatively, if you prefer not to use Cocoapods, put all the files from the Vrtcal-Fyber-FairBid-Adapters of your Vrtcal SDK download into your project.
- If you have not done so already, ask your VRTCAL account manager to create your VRTCAL ad unit. Ask for integration parameters and write down the App ID and Zone ID.
Follow these instructions to create an ad unit on your Fyber FairBid account and configure mediation:
https://developer.fyber.com/hc/en-us/articles/360009974718-Setting-Up-FairBid- In your AppDelegate, import VrtcalSDK and initialize the SDK with your application ID:
Swift:
VrtcalSDK.initializeSdk(withAppId:12345, sdkDelegate:self)
Objective-C:
[VrtcalSDK initializeSdkWithAppId:12345 sdkDelegate:self];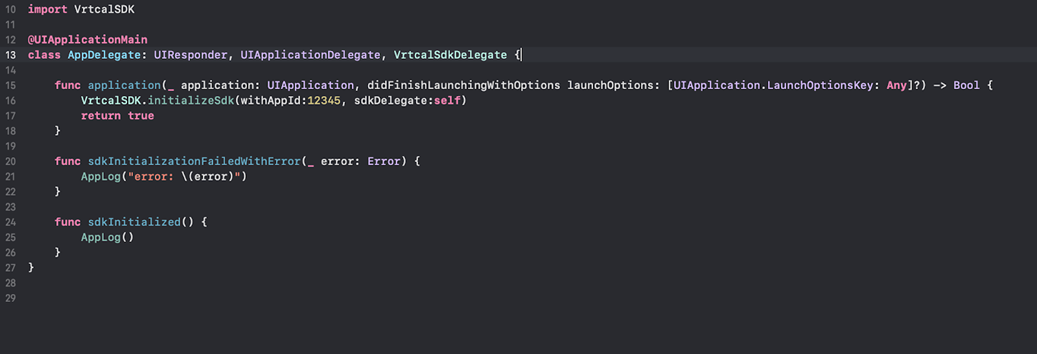
- Your Fyber FailBid ad unit should now be capable of displaying VRTCAL ads.
Mediating Vrtcal SDK through Fyber-Marketplace
Add the following line to your project's Podfile:
pop "Vrtcal-Fyber-Marketplace-Adapters"
From the command line, run:
pod install- Alternatively, if you prefer not to use Cocoapods, put all the files from the Vrtcal-Fyber-Marketplace-Adapters of your Vrtcal SDK download into your project.
- If you have not done so already, ask your VRTCAL account manager to create your VRTCAL ad unit. Ask for integration parameters and write down the App ID and Zone ID.
Follow these instructions to create an ad unit on your Fyber Marketplace account and configure mediation:
https://developer.fyber.com/hc/en-us/articles/4557133593361-Setting-Up-Marketplace- In your AppDelegate, import VrtcalSDK and initialize the SDK with your application ID:
Swift:
VrtcalSDK.initializeSdk(withAppId:12345, sdkDelegate:self)
Objective-C:
[VrtcalSDK initializeSdkWithAppId:12345 sdkDelegate:self];
- Your Fyber Marketplace ad unit should now be capable of displaying VRTCAL ads.
Ad Mediation (VRTCAL to Smaato)
Add the following line to your project's Podfile:
pop "Vrtcal-Smaato-Adapters"
From the command line, run:
pod install- Alternatively, if you prefer not to use Cocoapods, put all the files from the Vrtcal-Smaato-Adapters folder of your Vrtcal SDK download into your project.
- Go to your Smaato account and Create a banner and/or interstitial AdSpace. Copy the ID down.
- If you have not done so already, ask your VRTCAL account manager to create your Vrtcal ad unit. Provide them with the AdSpace id. Ask for integration parameters and write down the Vrtcal App ID and the newly created Zone ID.
- Your Smaato ad unit should now be capable of displaying ads via the VRTCAL SDK
Ad Mediation (VRTCAL to Tapjoy)
Add the following line to your project's Podfile:
pop "Vrtcal-Tapjoy-Adapters"
From the command line, run:
pod install- Alternatively, if you prefer not to use Cocoapods, put all the files from the Vrtcal-Tapjoy-Adapters folder of your Vrtcal SDK download into your project.
- Go to your Tapjoy account and Create a Placement. Copy its name.
- If you have not done so already, ask your VRTCAL account manager to create your Vrtcal ad unit. Provide them with the placement name. Ask for integration parameters and write down the Vrtcal App ID and the newly created Zone ID.
- Your Tapjoy ad unit should now be capable of displaying ads via the VRTCAL SDK. You can use Tapjoy’s Test Devices list and online developer console features to help debug your Tapjoy integration.
Ad Mediation (VRTCAL to Vungle)
Add the following line to your project's Podfile:
pop "Vrtcal-Vungle-Adapters"
From the command line, run:
pod install- Alternatively, if you prefer not to use Cocoapods, put all the files from the Vrtcal-Vungle-Adapters folder of your Vrtcal SDK download into your project.
- Go to your Vungle account and Create a banner and/or interstitial Placement. Copy the id down.
- If you have not done so already, ask your VRTCAL account manager to create your Vrtcal ad unit. Provide them with the placement id. Ask for integration parameters and write down the Vrtcal App ID and the newly created Zone ID.
- Your Vungle ad unit should now be capable of displaying ads via the VRTCAL SDK.
FAQ
Q: Where can I reach out for help?
A: Reach out to us at support@vrtcal.com
Q: How do I increase the likelihood that my ad gets filled?
A: There are many factors that affect advertiser interest and spend. Aside from the content type/category of your application, there things that you can do to build and maintain advertiser interest, such as (1) if you are able to include location data; (2) set a refresh rate of 30 seconds or greater; (3) include as much device data that is available; and (4) make sure the ad unit location is a good placement with content.
Q: Why are some ads showing up as blank?
A: This could be for many reasons, it may be an ad that was configured incorrectly by the advertiser, it could be that the ad is using the non-secure HTTP protocol which requires extra configuration to allow ads that use HTTP, or it could we something that need to look into email us at support@vrtcal.com
Q: Where do I create an Ad Unit?
A: Once you are a registered user on vrtcal.com navigate to the SDK Management section click on the "Add New Ad Unit" button.